Create Custom Post Types With Code
To register the custom post types in WordPress, you can either write the code manually:
function create_post_type() {
    register_post_type( 'elementor_product',
        array(
            'labels' => array(
                'name'=> _('Products'),
                'singular_name' => _('Product')
             ),
            'public' => true,
            'has_archive' => true,
        )
    );
}
add_action( 'init', 'create_post_type' );
Create Custom Post Types With Plugins

Or use one of the three most popular plugins designed to make the process much easier:
- CPT UI. This is one of the most popular plugins for adding CPT. Once added, CPT UI will be used to add the custom post type. A different plugin, ACF, will be used to add the custom fields.
- Toolset Types. Types is part of a whole list of Toolset addons, that all play a role in building listing, membership and other types of advanced sites using CPT. Toolset has a wider range of solutions than other CPT plugins. For example, you can use it to create an advanced search form for your CPTs.
- Pods. This is another plugin that gives you the ability to add custom content that includes custom post types and custom fields.
These plugins differ in various ways. If we try to summarize the difference, Toolset and Pods are better suited to use when you need to integrate conditions and relationships between CPTs and custom fields.
Using CPT UI
Before you start, go ahead and install two plugins: CPT UI.
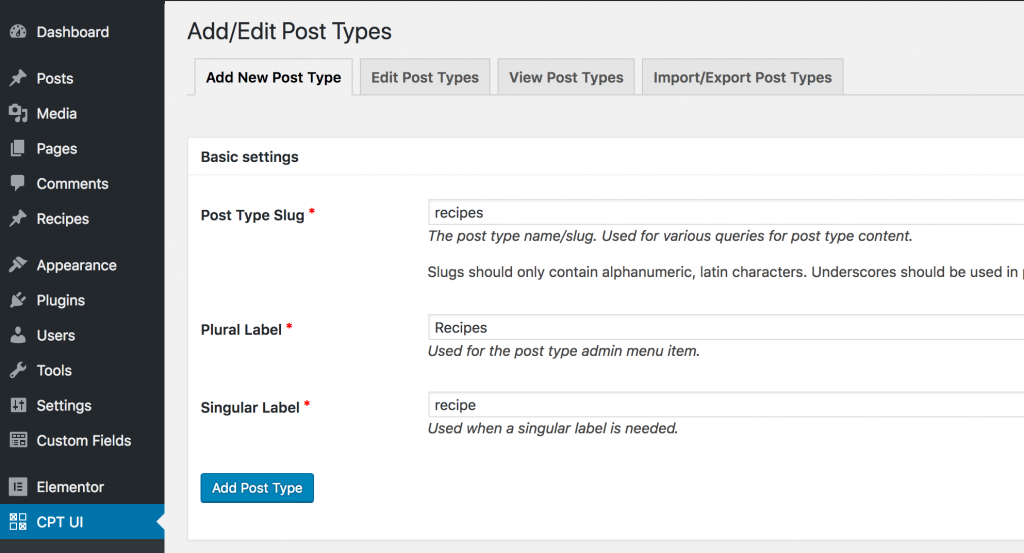
Once you install CPT UI, go to the plugins dashboard. Add all the required fields:
Post type slug: recipe
Plural label: Recipes (notice the capital R)
Singular label: Recipe
Under ‘Additional labels’ you can customize the names of other native WordPress fields, but for this example we’ll leave it as the default.
Under ‘Built-in taxonomies’, check Categories and Tags, so we can later order our recipes under parent categories and allow the user to browse through recipes using tags.
That’s it regarding our CPT, now hit ‘Add post type’. You’ll notice a ‘Recipes’ CPT appearing as a new WordPress dashboard item.
If we go into that item, we see it behaves similarly to Posts and Pages, and I can already add a new recipe.
The next step is to add custom fields to make our CPT structure unique and different from posts and pages.
Create Custom Fields Using ACF
Now, go ahead and install ACF. To embed ACF custom fields in Elementor, you have to enable the beta version of ACF 5.
- Under Dashboard > Appearance > Editor > Theme Functions, add this code:
/**
 * Enable ACF 5 early access
 * Requires at least version ACF 4.4.12 to work
 */
define('ACF_EARLY_ACCESS', '5');
- Then, you will get a notification to upgrade to ACF version 5. Run the upgrade, and then click on the notification to update your database.
- Now, under Dashboard > Elementor > Settings, make sure ‘Recipes’ is checked as a supported CPT. This is how to enable Elementor on the custom post types you are creating.
- In the WordPress dashboard, Under ‘Custom Fields’, add a new custom field and call it ‘Ingredients’.
- Set Field label to ‘Ingredient’. The field name will automatically get filled as ‘ingredient’.
- Set the field type to ‘Text area’.
- Under Location, set a rule to show this field group if Post Type is equal to Recipe.
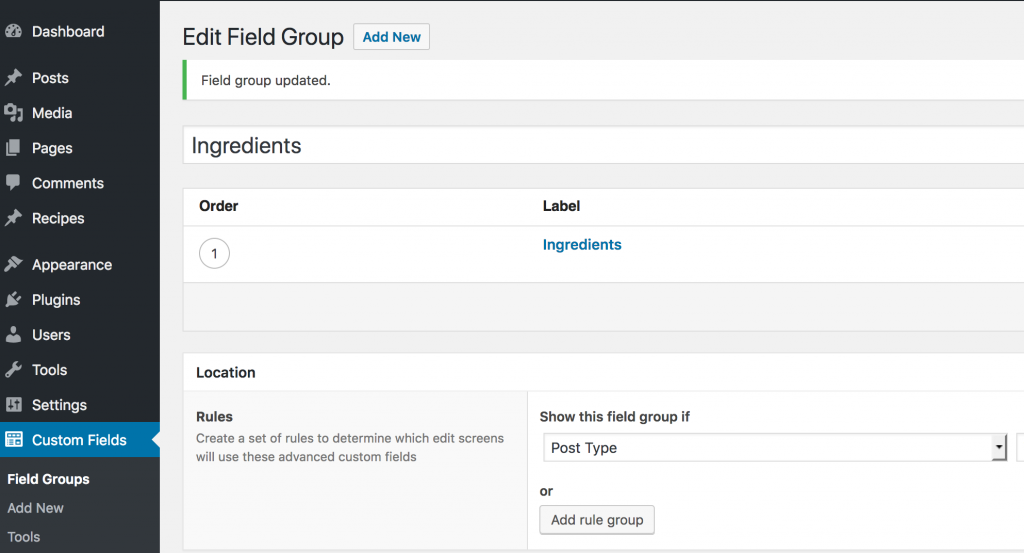
This example of building an ingredients field shows how to list custom fields using the text area field type. This is handy in many occasions where the custom field comprises of a list of information. If you’re starting out with CPT, it is recommended to study the various field types and be sure to choose the right one for each custom field you create.
Create Demo Content
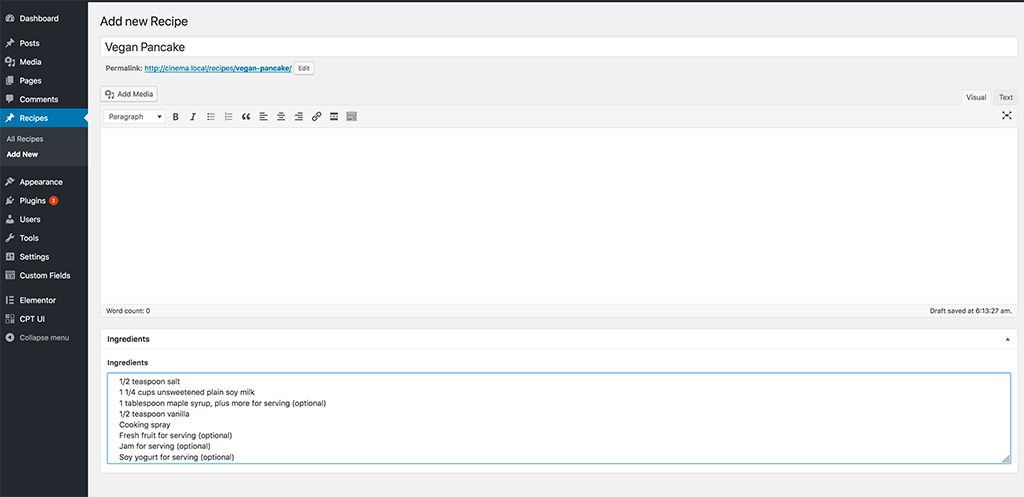
This is the stage where we add the demo content to our newly added CPT. Add a new recipe, and call it ‘Pancakes’. Under the ingredients field add the ingredients, separating each ingredient with a new line.
Displaying CPT Content in Single & Archive Templates
With Elementor and custom fields you can create dynamic pages without the use of code. By utilizing Elementor’s Theme Builder, you can create Archive and Single Post templates for your Custom Post Types, and you can easily select your custom fields from any Dynamic Content list to display them anywhere you wish. And of course, it is all easily styled, the Elementor way!
Create a single page Template for a Custom Post Type

To get the custom post types to show on blog pages, it’s important to understand how CPT enters into different areas of your site.
If we take the recipe site example from before, each recipe can be published inside your blog. Instead of the standard format of the blog post, you are using CPT to create a custom recipe structure for your blog posts.
Here is the process you should follow to achieve this:
- Create a new single template, and add a new text widget. As an example, we’ll use the heading widget.
- Click on the dynamic icon, and choose ACF Field. Click on it again, and under ‘key’, choose ingredient. The ingredients you added earlier will now appear.
- Now, all that’s left is to publish. Under the conditions choose ‘All Recipes’ and hit publish again.
Here in Elementor, we released several tutorials which show the process of styling CPT content and custom fields using the power of the Elementor editor. These tutorials show how to add css styling to WordPress custom post types and taxonomies without having to manually code the CSS. For designers, this is a much more streamlined process of dealing with dynamic content, and saves a lot of time, as well as guesswork.